Monthly Archives: October 2014

Get Ready for End of Year Tasks

Here is a checklist of items you can do now to get a head start on payroll and accounting tasks for the new year:

Review the payroll closing process
Watch our training videos on the year end closing and year end reporting process at http://www.datatechag.com/video/.  If you have any questions about the closing process or reports it would be beneficial to call or email your questions before January.

Review Employee/Payroll Information
The end of the year is when many companies find duplicate employee accounts and employees with incomplete Social Security Numbers. You may want to start this process now before you complete your year end payroll closing.

The Employee Abbreviated/Detail Lists includes the option of running just Employees with Year to Date Wages and Bad S.S. #’s. You may also want to run the report for all employees by Alphabetic Order to look for duplicate accounts. Call Datatech’s support dept. if you need assistance moving checks.

Check your online login for the SSA Business Services Online website (electronic filers)
If you don’t regularly use the BSO website, it would be a good idea to find your login information and make sure you can easily access the site and login. If not already done so, you also need to request access to services, including submitting W-2 files. You can access the website at: http://www.socialsecurity.gov/bso

Make sure your G/L is in balance (for 12/31/14 filers)
Go to the General Ledger menu, Transaction and select Detail Report (Update). Select your starting and ending dates for the fiscal year. If the starting date is in a prior fiscal year, you will need to update that year first.

When the Update is complete a window will appear. If the Starting, Current and Ending Balances are zero, everything is in balance. If there is an amount in the Starting Balance, you may not have closed your prior fiscal year or you have something out of balance for the prior year. This may include your starting balances if this is the first year you are using Datatech software.

If there is an amount in the Current Period, click on the Diagnose button. This will bring up the G/L Out of Balance Diagnostic. Run the Diagnostic for the fiscal year. This will provide the dates and source journals that are out of balance. You can then call the support department with that information and they will assist you in correcting the problems.

Check A/P and A/R Aging Report Totals
Update your general ledger balances as described above. The Control Total on the A/P and A/R Aging Reports should match the Report Total of each report. The Control is your general ledger balance and is what will print on financial statements. If there are any discrepancies you can call our support department for further instruction on running the Audit reports in order to correct the balance.

W2 Ordering & Printing Information

Following are the guidelines and options for ordering and printing your W-2’s.

Be aware that office supply stores carry multiple three and four per page formats. Compatible forms will have the form number from this article printed on the W-2.  If you cannot determine whether a format is compatible, do not order it. We recommend ordering your forms from The Advance Group as they are familiar with compatible Datatech formats. Call them at (559) 227-1192 or (800) 522-5758.  Datatech does not supply W-2 forms or keep any extra forms on hand if you run out.

Order enough W-2’s! To help in deciding how many W-2’s to order, you can use an option on the Year End Tax Reporting menu for counting employees with year to date wages. This will tell you the current number of employees you will need W-2’s for. Be sure to add in additional W-2’s for new hires, paper jams and reprinting individual W-2’s.


Many customers have asked about printing W-2’s on blank paper directly from the software. There are two reasons that we have decided not pursue printing blank paper W-2’s for the employee:

1) The IRS requires that the employee copies have the printed filing instructions on the back of the W-2. This means that you would still have to purchase forms with the back side pre-printed. The cost of these forms are the same as having both sides pre-printed.

2) Even if you wanted to print one or both sides on blank paper, you will spend more money in toner that you would buying the pre-printed forms.


There is an option to print the Employer’s W-2 (Copy D) on blank paper. This will print the entire W-2 Copy D form on blank paper, but will not print any instructions on the reverse side. This form prints two employees per page. This form is not approved for Copy A (for SSA) or for any of the Employee Copies. It can only be used to print the Employer’s Copy.

Note: We no longer support printing W-2’s on dot-matrix printers. The option to print W-2’s on dot matrix printers will remain in the program, but no changes will be made to the format. Dot-Matrix W-2’s will not print employer paid health insurance premiums, as required by law.


Compatible Forms

Form #/Set # Description
L3UP Three W-2 copies per page (one employee per page)
L4UP Four W-2 copies per page (one employee per page)
LW2A Single Set for printing Copy A only (2 employees per page)
LW2DI Single Set for printing Employer Copy D only (2 employees per page)
95211* Four part set, 50 employees (2 employees per page)
95212* Six part set, 50 employees (2 employees per page)
95214* Four part set, 100 Employees (2 employees per page)
95216* Six part set, 100 Employees (2 employees per page)

*These Set #’s are for The Advance Group. Other form suppliers may have different numbers. These sets also available with envelopes.


Printing Options for Electronic Filers

1) L4UP (Recommended). Select the 4 per Page format when printing and give the entire page to the employee. Then select the Employer Copy option and print the employer copy on blank paper.   You may also save the Employer Copy to a PDF file for archival purposes.

2) L4UP. Select the 4 per Page format when printing. Remove one copy for your Employer copy.

3) L3UP. Select the 3 per Page format when printing. Select the Employer Copy option and print the employer copy on blank paper.

Optional for methods 1 & 3: If you would prefer to have the Employer Copy on pre-printed paper, you may order the LW2DI form. Select the 2 per Page format when printing.


Printing Options for Paper Filers

1) L4UP & LW2A (Recommended). This option allows you to obtain all the needed copies without sorting employee sets. Print the L4UP using the 4 per Page setting. Give all 4 copies to the employee. Print the W-2 Copy A form using the 2 per Page setting. Print the employer copy on blank paper using the Employer Copy setting. You may also save the Employer Copy to a PDF file for archival purposes.

2) L3UP & LW2A. Print the L3UP using the 3 per Page setting for the employee. Print the W-2 Copy A with the 2 per Page format. Print the employer copy on blank paper using the Employer Copy setting.

Optional for methods 1 & 2: If you would prefer to have the Employer Copy on pre-printed paper, you may order the LW2DI form. Select the 2 per Page format when printing.

3) Two employees per page. Order the four or six part sets based on the number of copies/employees needed. Print W-2’s using the 2 per Page option once for each copy.   Then you will need to tear off and collate the copies for each employee.

User interface update

Starting this month, updates to Datatech Accounting Software will get a new look.  These changes will be available via the Check for Updates option around October 13th.  Customers that have updates downloaded by our Support Department will start getting these changes before that.

Since the beginning of time, our programs have used MS Sans Serif, the default system font that originally shipped in Windows 95.  Now our software will use the current Windows system font.  Microsoft introduced a new font (Segoe UI) in Windows Vista/7/8 for applications to use that is easier to read and designed for modern LCD displays.  (If you are still using Windows XP, our software will use its system font, Tahoma.)

Besides making the application look better overall, using the current system fonts instead of MS Sans Serif also enables us to provide support for the font scaling settings provided in Windows.  This makes everything bigger and did not always work well using the older font.  Some of our customers who have found the size of the type difficult to read will now be able to run their systems at 125% font size (“Medium” fonts in Windows Vista/7/8, “Large Fonts” in Windows XP), resulting in a more readable user interface.

Making text bigger of course means you can see less information on the screen.  But as higher resolution displays with higher DPI (dots per inch) counts become more common, everything has tended to get smaller (because the actual dots on the monitors are getting smaller).  Switching to the 125% font size setting can get text back to a readable size again.  (Another solution is to buy a bigger monitor!)

Switching to the system font on Windows Vista/7/8 affects the sizing of the windows, generally they will be about 15% larger.  This is because the letters in Segoe UI are slightly larger than the old MS Sans Serif font.  If you also enable larger fonts in Windows, then the windows will be about 25% larger. Some customers may find that the new font setting will make some windows too large to fit on their monitors.  This will largely depend on the size of your monitor and the resolution that you have it set at.  If this happens, you can disable the use of the system font and everything will go back to the way it was.   (See instructions below.)

To illustrate the changes, here are a some partial screenshots showing the old and new fonts in both Windows XP and Windows 7:

Windows XP Windows 7

xp_mss_100

Original MS Sans Serif font using the “Normal” Font size (100%).

7_mss_100

Original MS Sans Serif font @ 100%. Compared to the Windows XP example, the window size and layout is nearly identical.

xp_tahoma_100

Tahoma system font also at the “Normal” font size. The size of Tahoma font is very close to MS Sans Serif, so the overall size of the window, labels and entry forms are nearly identical.

7_segoe_100

System font (Segoe UI) at 100% (normal) font size. Simply using the system font causes everything in the window to scale up about 15% (almost as big as the Windows XP with Large Fonts example below).

xp_mss_125

Original MS Sans Serif font using the “Large Fonts” setting in Display Properties. Only the window title bar is larger. The labels and entry forms are all the same size as the “Normal” font setting.  Customers that wanted to use the Large Fonts setting in Windows XP were out of luck.

7_mss_125

Medium (125%) text size. Just as on Windows XP, using the larger font setting increases the size of the title bar, but not any of the labels and data entry forms.  Customers that wanted to use the Large Fonts setting to make text big enough for them to read were still out of luck!

xp_tahoma_125

Tahoma system font with the “Large Fonts” setting enabled. The overall window is about 25% bigger and all of the labels and entry forms are scaled up by the same amount.

7_segoe_125

Medium (125%) text size and the system font (Segoe UI). Everything is now scaled up in size in the window.

A Full Screen Example

The following screen shots show the same Daily Payroll window with the old and new font.  In each case, the main program window is the same size, 1024 x 768.  Click on the images to see them full size.

font_dailypr_mss

Windows 7 using original MS Sans Serif font.

font_dailypr_segoe

Windows 7 using the Segoe UI system font. The Daily Payroll window is displaying the same amount of information, but it takes up more of the screen area when using the system font.

How to disable using the System Font

To disable the System Font, go to Tools->Program Setup->Main->General and uncheck theUse Windows Font checkbox:

font_program_setupRestart the program for this setting to take effect.  This setting is applied on a computer by computer basis, so it is possible to use the System Font on some workstations but not others.

If your user account is restricted from opening the Program Setup window, an administrator may need to log in to the program on your workstation so that you can uncheck this box.  Once it has been unchecked, you can log out of the program and log back in with your regular user name.

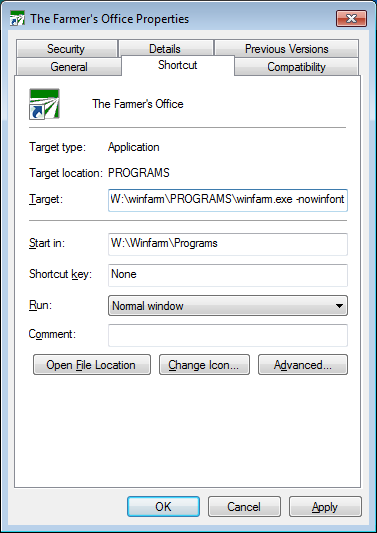
You can also disable using the System Font by adding the parameter “-nowinfont” to the shortcut that you use to open the program:

font_shortcut

Add the “-nowinfont” right after the program name (winfarm.exe, shipper.exe, etc.) and before anything else that appears after the program name.

How to change font settings in Windows

In Windows Vista/7/8, right click on the Desktop and select the Screen resolution option.  Click on the Make text and other items larger or smaller link.  Select either Smaller (100%), Medium (125%) or Larger (150%).

In Windows XP, right click on the Desktop and select Properties.  Click on the Appearance tab.  The Font size setting appears in the bottom left corner of the window.  Select from either Normal, Large Fonts, or Extra Large Fonts.

When you change the font size, you may need to restart or log off before the change can take effect.